Kitchen Adventures

Easy Mozzarella Cheese Recipe (Expanded version)

Making mozzarella cheese at home is easy but time-consuming. One batch takes about 2 hours and yields 13 oz of cheese per gallon of milk which for me, is 13- 85 calorie servings.

Followup to the bare bones recipe posted yesterday.

Tools Required:

  • Pot to hold 1 gallon of high fat milk
  • Thermometer (affiliate link)
  • Measuring cups and teaspoons
  • stirring instrument like a whisk or fork
  • plate to hold curds between steps
  • Latex or similar gloves to provide a minute heat barrier
  • Ladle for dunking curds in the whey (I use a 1 cup measuring cup)

Materials Required:

  • Time – 2 hours active, 0 hours passive
  • 1 gallon of high fat milk
  • 1/8 teaspoon liquid rennet (can use other types, just follow the directions on the box) Affiliate link
  • ~2 teaspoons of sea salt
  • 1 teaspoon acid to get milk to curdle. Affiliate links: small, economically large (I use it in DIY dishwasher detergent)

Procedure:

  1. Pour milk into crock pot or regular pot and slowly heat milk to 55 degrees Fahrenheit (13 C)
  2. While milk is heating, stir the acid into a bit room temp water- just enough to dissolve the acid.
  3. When the milk is 55 degrees, stir in the acid solution then continue heating.
  4. While milk and acid is heating, dissolve the rennet in the same manner as the acid
  5. When the milk reaches 88 degrees Fahrenheit (31 C) then stir in the rennet.
    1. Do not stir any more after this point!
  6. Slowly heat to 110 degrees (43 C) then hold the temperature until the curds pull to the middle leaving clear whey around the sides.
  7. Scoop out and drain the curds while heating the remaining whey to about 175 degrees (80 C).
  8. Aggregate the curds into a few groups, then dunk and hold in the hot whey kneading between dunks.
    1. The dunking and kneading is to raise the entire curd to the right temperature which is too hot to handle.
    2. Don latex gloves for kneading.
  9. Once the cheese is almost done, add a few teaspoons of salt to the whey.
  10. Repeat dunking until the cheese is smooth and stretches like taffy.
    1. It can now be rolled and cut/twisted or balled or however you wish to store it.
    2. If it starts breaking instead of stretching, just redunk to warm it back up
  11. Eat, refrigerate for up to 2 weeks or freeze the finished cheese.


Pictures:

20160410_151911

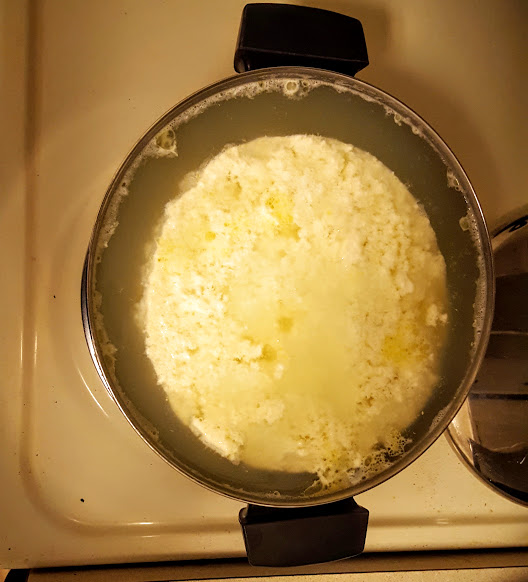
Curds are fully separated from the whey

20160410_152111

Collecting the curds and straining the whey. Cheese is starting to reveal itself!

20160410_154322

First round of dunking the irregular, lumpy curds into the hot whey

20160410_162603

Ready for the final dunking. As the curds turn to cheese demonstrated by their smoothness, I consolidate them into the storage size. I also keep a little sample set aside for immediate eating.

20160410_162718

Final amount of cheese from 1 gallon of milk. Side note: I adore and fully endorse this scale (affiliate link)

Yes, that’s right…1 gallon of milk only yields 13 oz. of cheese. It takes less time overall but a lot more work than yogurt and the result is a biologically inactive product. Although I love cheese, the roughly 3/4 gallon of whey that remains is my try goal. I mostly use it in to make stock in combination with animal bones, or inoculate it with yogurt whey to replace my $60/month probiotic. Luckily the whey is so useful, the once waste bi-product of cheese making has overtaken industrial production of the valuable cheese itself. I’ll explain more ways to utilize whey tomorrow!

If you possess a greater amount of patience than me, you can keep the curds warm to roll, stretch, twist, cut, etc. your way into beautifully presentable cheese. When I use mozzarella, it is to grate for pizza/pasta type dishes or rip chunks off to stuff under fish or fowl skin before baking. So I don’t put much effort into presentation. It is however rich and delicious but you will likely need to play with the salt levels in the dunking whey to nail your desired levels.
Standard
Kitchen Adventures

Easy Mozzarella Cheese DIY (simplified recipe)

The process to make mozzarella cheese is so simple but a bit time consuming. This recipe assumes 1 gallon of milk with 1 teaspoon of citric acid and 1/8 teaspoon rennet, both diluted in a small amount of water.

  1. Heat milk to 55 degrees Fahrenheit (13 C) then stir in an acid.
  2. Slowly heat to 88 degrees Fahrenheit (31 C) then stir in the rennet.
  3. Slowly heat to 110 degrees (43 C) then hold the temperature leaving the pot unstirred until the curds pull to the middle leaving clear whey around the sides.
  4. Scoop out and drain the curds while heating the remaining whey to about 175 degrees (80 C).
  5. Aggregate the curds into a few groups, then dunk and hold in the hot whey kneading between dunks.
  6. Once the cheese is almost done, add a few teaspoons of salt to the whey.
  7. Repeat dunking until the cheese is smooth and stretches like taffy.
  8. Eat, refrigerate for up to 2 weeks or freeze the finished cheese.

Don’t discard the whey! I’m working on a post to describe all the uses for this nutritious and versatile substance! I will also post a more detailed recipe tomorrow but I know some readers appreciate concise DIY posts. Enjoy!


Standard
Kitchen Adventures

First attempt at making yogurt in the crockpot

I’ll be brief and minimally graphic in this introduction. A waterborne illness infected my body in Africa and wrought havoc on my digestive tract and consequently my immune system for 16 months. My doctor was astounded I hadn’t taken any antibiotics because she found alarmingly low levels of the required microbes in my intestinal tract. She recommended nearly unfathomable amounts of probiotics, incorporating fermented foods into my diet and feeding those microbes with vegetable based fiber. Unpasteurized full fat yogurt, VSL #3 (affiliate link) and farmers market sauerkraut (and recently I have added kombucha) were the factors that brought my recovery at long last. Since all of these are very expensive or simply unavailable except seasonally, I decided to try and make my own family of inexpensive probiotic foods. Surprisingly, my first attempt yielded the most amazingly rich and tart yogurt I have ever had!

20160409_145921

Tools Required:

  1. Slow-cooker, preferably with a warm setting. Mine is a staple of my kitchen and stays warm for 6 hours after cooking (affiliate link)
  2. Pot if you are going to use the double boiler method. Otherwise just use the ceramic crock pot!
  3. Half Gallon of high fat milk
  4. Whisk or fork
  5. Tightly woven fabric for straining if thicker or greek style yogurt is prefered. Cheesecloth is too open, so use muslin or similar fabric (affiliate link)
  6. Stove to heat pot
  7. Thermometer (affiliate link)

Materials Required

  1. Time: 1.5 hours active, 15 hours passive
  2. High Fat Milk
  3. Yogurt culture: either biologically active commercial yogurt (check label for microbes) or probiotics (affiliate link)

Procedure

  1. Pour a half cup or so of milk into a bowl and stir in your starter culture (material #3)
  2. Pour the rest of the milk into the pot and slowly heat it up to 180-200 degrees (82-93 C).
    1. Some literature says this alters the protein structure so the milk sets rather than separating into curds and whey.
    2. Heat slowly and stir often to ensure milk does not scorch or burn on the bottom
  3. When the milk reaches 180-200 degrees, add a few cups (not so much that it overflows your yogurt pot) of cold tap water to the crockpot then transfer to the pot with the hot milk to the crockpot. Add more cold water if there is room.
    1. Somehow, without any further action the temperature of the milk/water in the crock pot equalized after 10 minutes perfectly at 110, the desired temperature!
  4. Cool the hot milk to 110 degrees (43 C) then stir in the starter culture from step 1
  5. Keep the temperature at 110 for 2-4 hours
    1. I turn the crockpot on warm for 30 minutes, off until the temperature drops to 100. Then repeat as necessary.
  6. After ensuring the milk is at 110, wrap the entire ceramic part of the crockpot with a towel or blanket for insulation, then transfer to the oven for another 6-10 hours.
    1. The oven simply provides insulation so turn the light on if you have one. Alternatively you can use a cooler or a pile of blankets or towels.
  7. Check the yogurt to see if it has set properly and to the desired extent. If not, just let it keep fermenting and warm it up if you can.
  8. If the yogurt has set, transfer to your desired storage containers and refrigerate.
    1. The rest of the steps are optional!
  9. If you like your yogurt more tart, let it keep fermenting and taste test until it gets there
  10. If you like thicker yogurt or greek yogurt, straining is required. Either:
    1. Line a colander with the straining fabric
    2. Hang the linked yogurt bag above a 2 quart bowl
      1. Using this method yields 17 oz. (weight) of yogurt and about 30 oz (fluid) of whey per half gallon of milk, or 4 234 calorie servings.

Some pictures of the process

20160408_220347

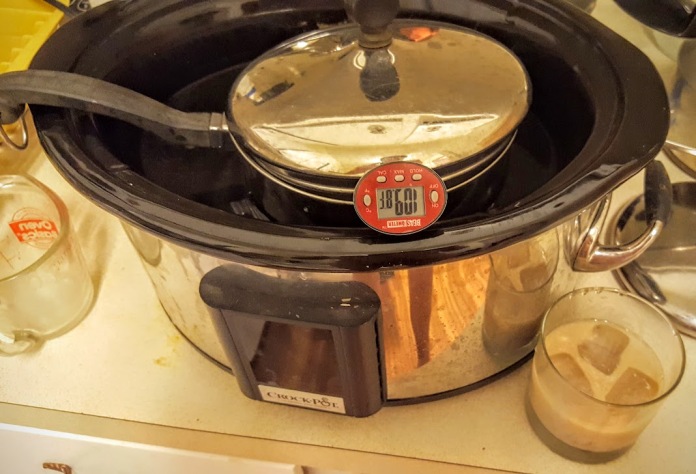
Basic process. Note the most important step: take a bit of the milk for a white russian!

20160409_104018

While coffee is being brewed, the yogurt is strained into greek style after a night of sleep allowed it to ferment and set.


20160409_172136

I like really thick yogurt. Ok ok, my preferred product resembles yogurt cheese more than Greek yogurt!

Whey

20160409_145921

After straining to thicken or make greek yogurt, about half of the volume of milk will remain in the form of whey. Whey is incredibly nutritious: packed with enzymes, probiotics and protein but also contains a concentrated amount of the substances that cause lactose and dairy allergies/intolerances. I’ll write a piece dedicated to whey in the future. For now, you can drink it as a probiotic, inoculate fermenting veggies, substitute it for water in recipes like bread or stock/broth for a protein (and calorie!) boost, spray it on plants to mitigate powdery mildew, add it to soil/compost as an acidifying fertilizer, or feed it to livestock or pets!

Final thoughts

Preface:

As this was my first attempt, I made a small batch in case I failed. This allowed me to use my crockpot and a soup pot as a double boiler. No incubator or specialized equipment was necessary. There is a lot of time required, but it is mostly passive. In the future, I’ll be upping the batch to 1 gallon of milk or more.

Secondly, our bodies are designed to digest fat as a primary food source while carbs cause the inflammation that was originally attributed to cholesterol and fats (and heart disease, high blood pressure). In fact, the human body produces cholesterol to repair the inflammation caused by carbs so high cholesterol is an indicator of a problem, not the problem itself (202 kB PDF Meta-analysis of 76+ studies). More fat in the milk correlates with more yogurt or cheese can be extracted. So don’t fear consuming fat, and use high fat milk for this process!

Lastly, yogurt doesn’t really “go bad” per se. Instead the tartness increases until it reaches vinegar levels. The fermentation acts as a preservative which is why we can leave it unrefrigerated, even more so warmed to the ideal growth temperature for spoilage microbes, for so long with no ill effects. The same can actually be said for milk which turns into yogurt, cheese or any of the fermented products that form staple foods in the Middle East (eg: kefir, laban) and Asia. Although when uncontrolled, potentially harmful microbe colonies can outcompete the desired ones. So as long as a reasonable amount of time has passed while the yogurt was refrigerated and there is no fuzzy discoloration, the yogurt is likely to reach an unpalatable tartness before it actually expires!


Standard
Bees

First Spring Check on the Beehives Coming Out of Winter

Last weekend it was reasonably nice with temperatures creeping into the 60s with gusty winds. It was not the ideal time to check on the bees, but it was close enough and aligned with a break in my schedule.

I didn’t plan on doing a full inspection just yet but I did plan to get in enough to make sure the hives were even still alive. As a first year beekeeper without a mentor, I certainly did everything I read and gleaned from forums to ensure winter survival. Yet being realistic…I wasn’t sure it was enough.

The weaker hive from last year had about 14 frames of stores going into winter where the stronger hive had 18. I left each hive a half pound of sugar atop newspaper on top of the frames to provide winter snacks. Others use fondant or sugar cakes which I find to be an unnecessary use of time and energy. All forms of dry sugar are consumed by bees solely for immediate nourishment whether it is plain old granulated sugar or if it been processed into something else.

This “weak” hive was literally buzzing with activity as I approached. Upon opening the hive, most of the sugar remained untouched by the bees. However a few small hive beetles scurried from the light. In large numbers in a weak hive, these beetles could be a problem. Otherwise a healthy colony will deal with them just fine on their own. The main cluster of bees was spread across the bottom half of 3 frames in the upper super. No cause of concern was found so I moved onto the next hive.

My “stronger” hive was alarming even from a distance. No bees were flying in or out and there was not a single guard out front. Opening the hive caused nothing in the way of the anticipated buzzing sound and revealed entirely consumed sugar that was left for winter snacking. Uh-oh!

Turned out the bees were just cold which makes sense as the siting of this hive does provide much early day spring sun. The cluster was small and confined to either side of a single frame. My strong hive, while alive and seemingly happy, has fallen behind the previously weaker hive!

All that was done to either colony was adding the hive top feeder with 2 gallons of syrup and removal of the insulating hive wrap. Next chance I get I will return to remove the entrance reducers which I held off due to the weather forecast. Today strong gusts, snow flurries and near freezing temperatures shows that was a good decision, and if any syrup remains unconsumed, the decision to feed might not have been a good one.

Now my main concern is catching the building of queen cells, and spliting those frames to a Nuc the day that the bees cap those cells all in an attempt to simulate swarming. Time to buy and paint some nuc hives!

Standard
Garden

First Check on the Spring Garden

Wanting to let the sun heat up the farm and beehives, I planned to perform the desperately needed landscaping maintenance on the garden aisles. However the weedwacker would not continue running instead shutting off a after about 40 seconds of idling, or whenever I opened the throttle at all. The blisters on three fingers and the intense DOMS in my shoulder blade attest to how many times I got it started. Was it bad gas mixture that sat all winter? Was it the carburetor that a knowledgeable mechanic found to be on its last leg a few months ago? Either way, my desire to be independent from petroleum powered machinery was reiterated and the most time-consuming task on my to-do list was not attainable.

So I spent the time wandering and weeding the garden beds. The hops and asparagus were already sending shoots out of the ground while the buds of grapes and blueberries were beginning to swell.

20160403_125320

Emerging Asparagus

20160403_142215

Emerging, nitrogen hungry hops with symbiotic, nitrogen-providing clover companion planting

20160403_125308

Swelling grape buds

Notice the similarities between young hops and asparagus shoots? They can be harvested and prepared in the exact same manner. I will elaborate on this more in the future.


Standard
Garden

Absentee Gardening

This year the plan is to set and forget. I am going to deeply mulch the garden beds and leave them be as I will only be able to check in once or twice a month. I’ve got a plan for produce self sufficiency that I will expand upon in the future.

Other than groundhogs, water will be the anticipated issue, does anyone have any suggestions for plants don’t require much in the way of thirst?

Standard
Uncategorized

Breaking the technological stagnation of Beekeeping

There has been no major technological innovation in beekeeping since October 5, 1853. As a result, beekeeping still remains a very labor intensive practice where rising labor costs leave little room for profit. Thus hobbyists are responsible for a relatively large proportion of beehives in existence. Like the surging craft beer industry, the passion associated with hobbyist is yielding the first major innovations in over 160 years.

Getting the most publicity, the Flow Hive is nearly a household name. While I am very excited to see attempts at technological innovation, there are many shortcomings that will prevent me from trying these hives out in my own apiary. I’ll save that discussion for another post.

HiveHaven from New Zealand is doing amazing work to innovate beekeeping. They are turning HPDE from recycled bottles into 3-D printer feedstock (“ink”) and creating cutting edge hive designs. A major benefit of this material is that it can be washed and sterilized in the instance of foulbrood appearing in the apiary.

Have you ever wondered why bees build comb in the manner that they do? Hexagons are the most efficient pattern to fill a two dimensional space. Honeybees were able to figure out over 34 million years of evolution. Humans integrated that wisdom into products that need to maximize surface area like the catalytic converters in cars and wood stoves.

More importantly, HiveHaven also focuses on producing hives for other types of bees. Remember that New Zealand was forced to make a economics-driven decision whether to continue importing clover seed for pastures every year, or importing a bumble bee to pollinate and produce their own seed. The large mouthparts of honeybees prevent effective pollination of the tiny clover flowers. Mason, orchard and bumbles bees play a vital but largely unappreciated ecological role here in the US as well.

Now HiveHaven has completed the circle by taking the innovations bred from the geometric wisdom of bees, and applying back to those bees. In addition to the standard hexagonal comb, they provide hexagonal hives that reflect the natural tendency of bees to build upward. Finally some technology for solitary bee husbandry!

Read more about their campaign here.


Standard
Uncategorized

3-D Printing to save endangered species

I haven’t been writing much lately, but one post I have been putting together involves 3-D Printing in the apiary. However a small biotech company has plans to use 3-D printing in another way.

They plan to bioengineer synthetic rhino horns in order to flood the markets to hopefully remove economic incentive to harvest illicit animal products.

It is an interesting strategy that some argue could exacerbate the problem by creating demand for rhino horns. I’m no economist so I’ll defer that discussion to this solid piece of journalism from National Geographic.

As an avid hunter, conservationist and animal lover, I am happy to see technological innovation applied to the welfare of wildlife as well as eliminating the disgraceful practices of poachers that are all too often applied broadly to hunters.

Standard
Garden

Planting Garlic

I meant to plant this at the beginning of October. Out of all the factors that cause garlic failure, rot is the most responsible. As the farm received an extraordinary amount of rain around that time, garlic planting was postponed.

Then I got very busy as the slowdown of posts on this blog indicates. Garlic just fell off the to-do list until it was finally planted at the beginning of November.

Garlic basics

Individual garlic cloves are planted in the fall where they begin root growth. During the following spring, green top growth takes place yielding a full bulb in summer.

At this point, most garlic varieties will taste similar. Differences are developed as the bulbs cure. When the time comes, I will post on the harvest and curing process in greater depth.

Variety selection and pest deterring uses are covered in this previous post.

Planting process

Some recommend to pull the cloves apart from the bulb to be stored in a paper bag for 2 days before planting. I just yank them apart and put them straight into the ground. However, do your best to keep the papery covering around the cloves intact!

  1. Dig a small hole 2″ deep
  2. Place the garlic clove into the hole with the pointy side upward
  3. Refill the hole
  4. Repeat the steps with a 4″ spacing

I photographed the process thinking the immense size of my amazon-sourced Elephant garlic would help to demonstrate the process. Now I realize the single clove is the size of most entire bulbs of garlic and could introduce some confusion as well as change the needed planting dimensions.

Oh well, I’ll re-do this next year will appropriate sized bulbs.

IMG_20151103_120854

IMG_20151103_121130

IMG_20151103_121200

Standard
Garden, General Pasture

Agriculture caused global warming…7000 years ago

Shifting scientific consensus are fascinating trends to follow. Mounting Evidence Suggests Early Agriculture Staved Off Global Cooling published in the University of Virginia’s UVAToday demonstrates that exact type of change.

After analyzing ice core samples for carbon dioxide levels as well as pollen deposits, researchers have found that agriculture first started affecting global climate 7,000 years ago by preventing the expected cooling cycle.

Beginning 7,000 years ago, carbon dioxide levels began rising. The author attributes this to slash and burn techniques of clearing land for farming.

Beginning 5,000 years ago, methane levels started rising which coincides with large scale rice production. My assumption is the flooding of rice paddocks caused anaerobic decomposition conditions resulting in the release of large quantities of methane which is a greenhouse gas four times as potent as carbon dioxide. The author also states that domestication of ruminants could also be a factor or it could be a combination of both rice and ruminant husbandry practices.

After 12 years of debate, the consensus is shifting to agriculture being the main cause for staving off expected cooling trends.

Citation:

Samarrai, Fariss. “Mounting Evidence Suggests Early Agriculture Staved Off Global Cooling.” UVA Today. University of Virginia, 15 Jan. 2016. Web. 22 Jan. 2016.


I need to write a post on a relevant and absolutely eye-opening article published in Acres USA magazine about using soils to bank carbon. The interviewee is phD in soil sciences that explains the only way to build carbon (organic matter) permanently in soils is to keep plant roots pumping sugar into the soils to feed the symbiotic mycorrhizal fungi then leaving the soils undisturbed so the fragile humic globules are not destroyed. She asserts that all carbon from compost will eventually oxidize into carbon dioxide if plants do not constantly utilize those products of decomposition. Same goes for nitrogen in the form of off-gassing ammonia.

Standard