Kitchen Adventures

Many uses for whey

So you decided to try out making cheese or yogurt for the first time. Now you have a disappointing amount of your desired product, and an alarming amount of whey byproduct. Fear not, whey is so useful, that industrial production of this once waste product has surpassed production of actual cheese!

A word of warning, whey contains a concentrated amount of the substances that cause dairy and lactose allergies/intolerances.

Nutrition

Most of the fats and proteins have been removed from the whey when the solids were extracted for cheese/yogurt. While the remaining nutrition is mostly sugars, the vitamins and minerals are valuable. A cup of weight contains 60 calories, 13 grams of carbohydrates and numerous micronutrients (source).

Ways I’ve used Whey

Yogurt whey is fermented thus packed with the probiotics that many people (including myself) pay good money for. I drink a few ounces of whey when I wake up in the morning on an empty stomach. It has a weird combination of savory with an acidic tartness that I’ve acquired a taste for…likely from my love of sour beers and kombucha. Expect the same effects as probiotics…especially if you are relatively new to the scene! Mozzarella whey is not biologically active however if I am running low on yogurt whey, I will inoculate the former with the latter.

While cheese whey lacks the good microbes of yogurt whey, it is still full of nutrition. Furthermore it’s acidic properties pull great amounts of calcium, collagen and flavor from animal parts when used as the base in a stock (my observation, no scientific basis). Before I discovered whey, I used a vinegar water base to try and achieve the same effect. With the boost in nutrition comes a boost in calories as well that should be accounted for. I usually wake up with yogurt whey and go to bed with whey-based bone broth.

Similarly, when I still ate bread nothing was better than a loaf of sourdough with the the water replaced by whey. I can’t even describe the change in flavor but it was irresistible. If I could comfortably digest the products of baking, I would be trying whey in everything!

Seeing as protein is the most expensive food source for any creature, I have fed whey to livestock as well as pets. Fair warning, introduce whey slowly and incrementally into an animal’s diet to prevent having some loose messes to clean.

As a last resort, whey can be added to the compost pile or to the soil as an acidifying fertilizinger. If you have neither compost nor acid-loving plants, find someone with a compost pile or who grows blueberries or tomatoes!

Ways I want to use whey

Whey reduced the occurrence and rate of progress of powdery mildew in squash and cucumber plants (source). It seems weekly applications of 25% whey are the most effective, but more research is needed for exact timing and quantity determinations. I may try it on my grapes for the intended purpose and to see if there is any effect on the devastating japanese beetle populations.

Next time you make yogurt or cheese, smell your hands a few hours later. They will smell like those expensive cosmetics made with lanolin. In fact the smell is such an exact match, I would not be surprised is news broke that these products were being falsely advertised. Next batch of soap that I make, I will add some whey!

I’ve come across quite a few recipes for whey-based beverages ranging from simple, refreshing lemonade to creative cocktails. Citrus flavors and whey would be symbiotically complimentary in my opinion so I am going to try them out! I will surely report back.

Lastly, I am inexplicably eager to try out fermenting food. Everything from mayo, to krauts and kimchi to salsa to anything that can be brined or pickled is on the radar. Whey is known to kickstart those processes but I’ve read some foods are better suited for whey inoculation than others. Until I can report back with real experience, I have to defer this subject to your own research.

Conclusion

These are the options I’ve encountered or researched but I am sure there are many more. Putting whey down the drain is a water pollutant and a waste of a good resource so I hope you can find a way to put it to use!
Standard
Kitchen Adventures

Easy Mozzarella Cheese Recipe (Expanded version)

Making mozzarella cheese at home is easy but time-consuming. One batch takes about 2 hours and yields 13 oz of cheese per gallon of milk which for me, is 13- 85 calorie servings.

Followup to the bare bones recipe posted yesterday.

Tools Required:

  • Pot to hold 1 gallon of high fat milk
  • Thermometer (affiliate link)
  • Measuring cups and teaspoons
  • stirring instrument like a whisk or fork
  • plate to hold curds between steps
  • Latex or similar gloves to provide a minute heat barrier
  • Ladle for dunking curds in the whey (I use a 1 cup measuring cup)

Materials Required:

  • Time – 2 hours active, 0 hours passive
  • 1 gallon of high fat milk
  • 1/8 teaspoon liquid rennet (can use other types, just follow the directions on the box) Affiliate link
  • ~2 teaspoons of sea salt
  • 1 teaspoon acid to get milk to curdle. Affiliate links: small, economically large (I use it in DIY dishwasher detergent)

Procedure:

  1. Pour milk into crock pot or regular pot and slowly heat milk to 55 degrees Fahrenheit (13 C)
  2. While milk is heating, stir the acid into a bit room temp water- just enough to dissolve the acid.
  3. When the milk is 55 degrees, stir in the acid solution then continue heating.
  4. While milk and acid is heating, dissolve the rennet in the same manner as the acid
  5. When the milk reaches 88 degrees Fahrenheit (31 C) then stir in the rennet.
    1. Do not stir any more after this point!
  6. Slowly heat to 110 degrees (43 C) then hold the temperature until the curds pull to the middle leaving clear whey around the sides.
  7. Scoop out and drain the curds while heating the remaining whey to about 175 degrees (80 C).
  8. Aggregate the curds into a few groups, then dunk and hold in the hot whey kneading between dunks.
    1. The dunking and kneading is to raise the entire curd to the right temperature which is too hot to handle.
    2. Don latex gloves for kneading.
  9. Once the cheese is almost done, add a few teaspoons of salt to the whey.
  10. Repeat dunking until the cheese is smooth and stretches like taffy.
    1. It can now be rolled and cut/twisted or balled or however you wish to store it.
    2. If it starts breaking instead of stretching, just redunk to warm it back up
  11. Eat, refrigerate for up to 2 weeks or freeze the finished cheese.


Pictures:

20160410_151911

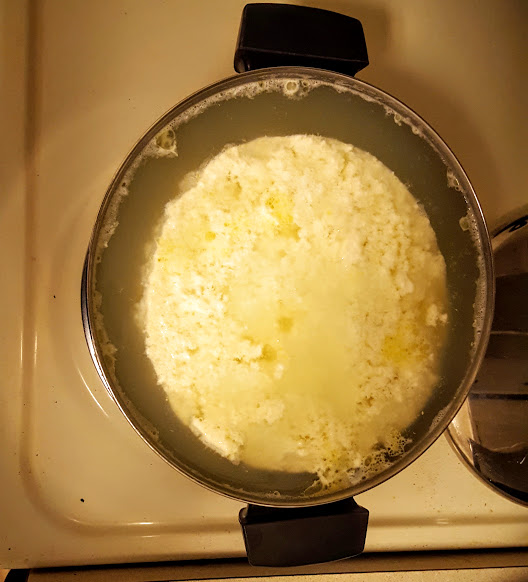
Curds are fully separated from the whey

20160410_152111

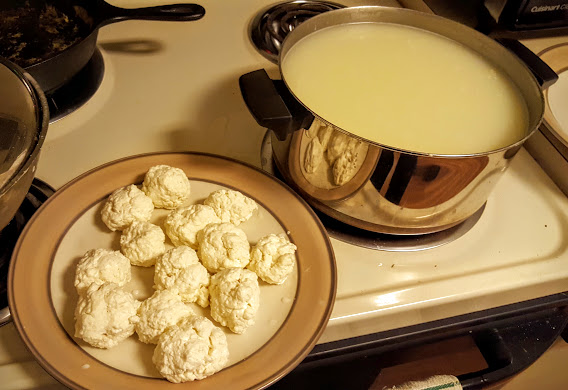
Collecting the curds and straining the whey. Cheese is starting to reveal itself!

20160410_154322

First round of dunking the irregular, lumpy curds into the hot whey

20160410_162603

Ready for the final dunking. As the curds turn to cheese demonstrated by their smoothness, I consolidate them into the storage size. I also keep a little sample set aside for immediate eating.

20160410_162718

Final amount of cheese from 1 gallon of milk. Side note: I adore and fully endorse this scale (affiliate link)

Yes, that’s right…1 gallon of milk only yields 13 oz. of cheese. It takes less time overall but a lot more work than yogurt and the result is a biologically inactive product. Although I love cheese, the roughly 3/4 gallon of whey that remains is my try goal. I mostly use it in to make stock in combination with animal bones, or inoculate it with yogurt whey to replace my $60/month probiotic. Luckily the whey is so useful, the once waste bi-product of cheese making has overtaken industrial production of the valuable cheese itself. I’ll explain more ways to utilize whey tomorrow!

If you possess a greater amount of patience than me, you can keep the curds warm to roll, stretch, twist, cut, etc. your way into beautifully presentable cheese. When I use mozzarella, it is to grate for pizza/pasta type dishes or rip chunks off to stuff under fish or fowl skin before baking. So I don’t put much effort into presentation. It is however rich and delicious but you will likely need to play with the salt levels in the dunking whey to nail your desired levels.

Standard
Kitchen Adventures

Easy Mozzarella Cheese DIY (simplified recipe)

The process to make mozzarella cheese is so simple but a bit time consuming. This recipe assumes 1 gallon of milk with 1 teaspoon of citric acid and 1/8 teaspoon rennet, both diluted in a small amount of water.

  1. Heat milk to 55 degrees Fahrenheit (13 C) then stir in an acid.
  2. Slowly heat to 88 degrees Fahrenheit (31 C) then stir in the rennet.
  3. Slowly heat to 110 degrees (43 C) then hold the temperature leaving the pot unstirred until the curds pull to the middle leaving clear whey around the sides.
  4. Scoop out and drain the curds while heating the remaining whey to about 175 degrees (80 C).
  5. Aggregate the curds into a few groups, then dunk and hold in the hot whey kneading between dunks.
  6. Once the cheese is almost done, add a few teaspoons of salt to the whey.
  7. Repeat dunking until the cheese is smooth and stretches like taffy.
  8. Eat, refrigerate for up to 2 weeks or freeze the finished cheese.

Don’t discard the whey! I’m working on a post to describe all the uses for this nutritious and versatile substance! I will also post a more detailed recipe tomorrow but I know some readers appreciate concise DIY posts. Enjoy!


Standard
Kitchen Adventures

First attempt at making yogurt in the crockpot

I’ll be brief and minimally graphic in this introduction. A waterborne illness infected my body in Africa and wrought havoc on my digestive tract and consequently my immune system for 16 months. My doctor was astounded I hadn’t taken any antibiotics because she found alarmingly low levels of the required microbes in my intestinal tract. She recommended nearly unfathomable amounts of probiotics, incorporating fermented foods into my diet and feeding those microbes with vegetable based fiber. Unpasteurized full fat yogurt, VSL #3 (affiliate link) and farmers market sauerkraut (and recently I have added kombucha) were the factors that brought my recovery at long last. Since all of these are very expensive or simply unavailable except seasonally, I decided to try and make my own family of inexpensive probiotic foods. Surprisingly, my first attempt yielded the most amazingly rich and tart yogurt I have ever had!

20160409_145921

Tools Required:

  1. Slow-cooker, preferably with a warm setting. Mine is a staple of my kitchen and stays warm for 6 hours after cooking (affiliate link)
  2. Pot if you are going to use the double boiler method. Otherwise just use the ceramic crock pot!
  3. Half Gallon of high fat milk
  4. Whisk or fork
  5. Tightly woven fabric for straining if thicker or greek style yogurt is prefered. Cheesecloth is too open, so use muslin or similar fabric (affiliate link)
  6. Stove to heat pot
  7. Thermometer (affiliate link)

Materials Required

  1. Time: 1.5 hours active, 15 hours passive
  2. High Fat Milk
  3. Yogurt culture: either biologically active commercial yogurt (check label for microbes) or probiotics (affiliate link)

Procedure

  1. Pour a half cup or so of milk into a bowl and stir in your starter culture (material #3)
  2. Pour the rest of the milk into the pot and slowly heat it up to 180-200 degrees (82-93 C).
    1. Some literature says this alters the protein structure so the milk sets rather than separating into curds and whey.
    2. Heat slowly and stir often to ensure milk does not scorch or burn on the bottom
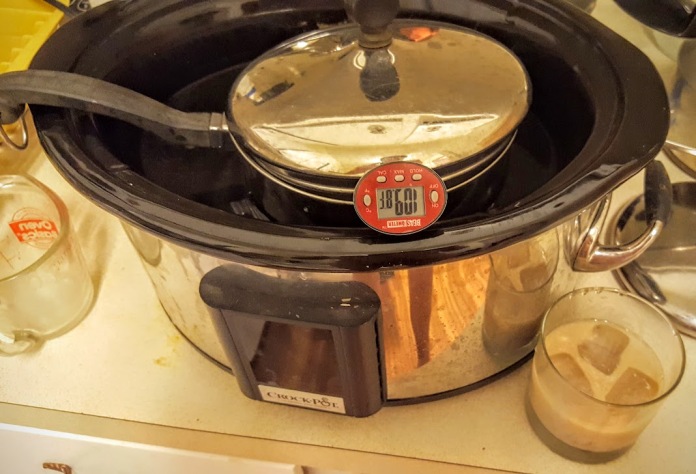
  3. When the milk reaches 180-200 degrees, add a few cups (not so much that it overflows your yogurt pot) of cold tap water to the crockpot then transfer to the pot with the hot milk to the crockpot. Add more cold water if there is room.
    1. Somehow, without any further action the temperature of the milk/water in the crock pot equalized after 10 minutes perfectly at 110, the desired temperature!
  4. Cool the hot milk to 110 degrees (43 C) then stir in the starter culture from step 1
  5. Keep the temperature at 110 for 2-4 hours
    1. I turn the crockpot on warm for 30 minutes, off until the temperature drops to 100. Then repeat as necessary.
  6. After ensuring the milk is at 110, wrap the entire ceramic part of the crockpot with a towel or blanket for insulation, then transfer to the oven for another 6-10 hours.
    1. The oven simply provides insulation so turn the light on if you have one. Alternatively you can use a cooler or a pile of blankets or towels.
  7. Check the yogurt to see if it has set properly and to the desired extent. If not, just let it keep fermenting and warm it up if you can.
  8. If the yogurt has set, transfer to your desired storage containers and refrigerate.
    1. The rest of the steps are optional!
  9. If you like your yogurt more tart, let it keep fermenting and taste test until it gets there
  10. If you like thicker yogurt or greek yogurt, straining is required. Either:
    1. Line a colander with the straining fabric
    2. Hang the linked yogurt bag above a 2 quart bowl
      1. Using this method yields 17 oz. (weight) of yogurt and about 30 oz (fluid) of whey per half gallon of milk, or 4 234 calorie servings.

Some pictures of the process

20160408_220347

Basic process. Note the most important step: take a bit of the milk for a white russian!

20160409_104018

While coffee is being brewed, the yogurt is strained into greek style after a night of sleep allowed it to ferment and set.


20160409_172136

I like really thick yogurt. Ok ok, my preferred product resembles yogurt cheese more than Greek yogurt!

Whey

20160409_145921

After straining to thicken or make greek yogurt, about half of the volume of milk will remain in the form of whey. Whey is incredibly nutritious: packed with enzymes, probiotics and protein but also contains a concentrated amount of the substances that cause lactose and dairy allergies/intolerances. I’ll write a piece dedicated to whey in the future. For now, you can drink it as a probiotic, inoculate fermenting veggies, substitute it for water in recipes like bread or stock/broth for a protein (and calorie!) boost, spray it on plants to mitigate powdery mildew, add it to soil/compost as an acidifying fertilizer, or feed it to livestock or pets!

Final thoughts

Preface:

As this was my first attempt, I made a small batch in case I failed. This allowed me to use my crockpot and a soup pot as a double boiler. No incubator or specialized equipment was necessary. There is a lot of time required, but it is mostly passive. In the future, I’ll be upping the batch to 1 gallon of milk or more.

Secondly, our bodies are designed to digest fat as a primary food source while carbs cause the inflammation that was originally attributed to cholesterol and fats (and heart disease, high blood pressure). In fact, the human body produces cholesterol to repair the inflammation caused by carbs so high cholesterol is an indicator of a problem, not the problem itself (202 kB PDF Meta-analysis of 76+ studies). More fat in the milk correlates with more yogurt or cheese can be extracted. So don’t fear consuming fat, and use high fat milk for this process!

Lastly, yogurt doesn’t really “go bad” per se. Instead the tartness increases until it reaches vinegar levels. The fermentation acts as a preservative which is why we can leave it unrefrigerated, even more so warmed to the ideal growth temperature for spoilage microbes, for so long with no ill effects. The same can actually be said for milk which turns into yogurt, cheese or any of the fermented products that form staple foods in the Middle East (eg: kefir, laban) and Asia. Although when uncontrolled, potentially harmful microbe colonies can outcompete the desired ones. So as long as a reasonable amount of time has passed while the yogurt was refrigerated and there is no fuzzy discoloration, the yogurt is likely to reach an unpalatable tartness before it actually expires!


Standard
Bees, Kitchen Adventures

Mead: The natural alternative to antibiotic resistance?

I’ve been organizing some thoughts to write a book and came across this relevant article. With overuse of sanitizing detergents and cleaners plus having a huge amount of antibiotics passed to us through industrial raised meats, humans are showing alarming signs of antibiotic resistance.

Could alcohol be the key? I’m not talking about pasteurized and filtered beers or sulfate laden wines or distilled spirits that are all biologically dead. I’m talking about the dying but recently reviving art of natural fermentation. Coupled with fermented foods likes yogurt, sauerkraut, kimchi, kombucha, etc. alcohol may be the key to our health.

“Honey-based mead may curb antibiotic resistance, say makers” from Reuters describes a new mead developed on ancient recipes. The only ingredients are honey and water. In its normal state, the sugar in honey is supersaturated beyond the point of feeding microbes because to bees, fermented honey is spoiled food. By adding water, honey is made appealing to the naturally occurring but dormant microbes in the substance can now ferment it into alcohol.

Here are the key figures from the article bulleted with my thoughts proceeding each:

Probiotics are gaining more and more importance resulting in more recommendations by doctors? My own recommended them to help recover from Giardia I picked up in Africa.

  • Mead has 100 billion live probiotic bacterium per serving.

The honey stomach of bees contains lactic acid bacteria, same as most human orifices including the birth canal. The helpful bacteria makes an inhospitable environment for disease-causing pathogens.

  • These bacteria plus honey have closed chronic wounds in horses who had become resistant to antibiotics.
  • These same bacteria have been proven to kill human pathogens as well. Even those that have shown resistance.

Diverse array of probiotics.

  • 13 lactic bacterium found in bees plus the wild yeasts all act to spontaneously ferment the mead.

This is the point that brings everything home for me. Researchers used modern science to identify the value of the microbes in honeybees stomachs and applied them to an ancient craft of making mead.

  • The results thus far have been promising and human trials are starting soon.

Cool stuff!

Standard
Kitchen Adventures

Preparing to Brew a Batch of Beer

Brewing beer is one of my favorite hobbies as the process itself is a simple as cooking any easy dish but the chemistry, biology, thermodynamics and microbiology allow the brewer to geek out if he or she chooses. If simplicity is desired, a good product can be made without any consideration to those science-based fields.

There are 4 main actions that can be completed the day before brewing to help speed up the process.

  1. Clean equipment
  2. Gather and treat water. If your water supply has chlorine you can allow it to sit uncovered overnight so it evaporates out. If it contains chloramines, it needs treated with something like Camden Tablets. Failing to remove either of these chemicals will cause the yeast to create phenols that taste rubbery or distinctly like bandaids.
  3. Measure out grains and hops
  4. Crush the grain.

Steps 3 and 4 can be completed by any homebrew shop or mail order store. I buy all my ingredients in bulk as I own a barley crusher.

Steps 1 and 2 are pretty self-explanatory so here are pics of the rest!

Measuring the grain:

IMG_20150408_135405


And crushing it:

IMG_20150408_135631 IMG_20150408_135720

You don’t want to make flour when crushing the grains. Cracking the husk and exposing the endosperm is the objective. The pictured crush is absolutely perfect by my standards!

A good crush also preserves the hull to act as filter and a conditioning agent in the mash. Basically its keeps the barley mash from caking solidly which would cause a huge issue when trying to drain and rinse the mash.

I brewed a batch yesterday but got lazy on pictures. I can continue explaining the process if there is any interest.

Standard
Kitchen Adventures

Two cereal grain products: The microbiology of sourdough and brewing beer

Bread and beer are as old as recorded history, and likely older. Infact brewing beer arguably pre-dates bread. While the first cereal grain uses were an edible porridge from collected wild grass seeds, the first brewer of beer likely left saturated grains in a container to be rained on then spontaneously fermented by wild yeasts. From then on, mankind’s insatiable appetite for alcohol was ignited. Some historians even argue that the desire for alcohol, not food, is what triggered mankind to first domesticate wild plants and invent the practice of agriculture.

In the beginning…

…both breads and beer were mysteriously transformed into airy and alcohol containing products by an unknown force. Inadvertently, mankind and the microbes responsible for fermentation greatly influenced each others’ futures as they co-evolved. By another chance discovery, the mash paddle, an item used to stir beer in the brewing process, was found to consistently produce beer if it was left uncleaned between batches. Even though the living microbes that caused this magical phenomenon were not yet discovered, humans were unknowling selecting and genetically engineering Saccharomyces cerevisiae for as long as beer has been brewed.

While this artificial selection had been occurring unwittingly, the discovery of fermenting yeasts and subsequent patenting of pasteurization by Louis Pasteur in 1865 in an attempt to fight the souring of wines marked the first time in human history that specific microbes could be targeted for fermentation and conversely, be targeted for destruction by pasteurization.

Beer

Natural yeasts have an alcohol tolerance around 5%. Many, many examples in nature of animals getting drunk in nature but not to much of a negative effect may be explained by this limiting factor. In fact ethanol is a potent energy source that humans developed a detoxification mechanism in the liver in order to tap into to gain an evolutionary advantage. Humans both intentionally and unintentionally have selected strains of yeast to tolerate increasingly high alcohol levels. Many varieties of Saccharomyces cerevisiae now exists with very distinct flavor characteristics. With the advent of pasteurization and sanitation techniques, beer is now a sterile and carefully controlled environment to ensure only the desired varieties colonize the wort (unfermented beer).

Sourdough

Initially, the microbe responsible for sourdough was thought to only exists in San Francisco, despite sourdough having existed all around the world for all of recorded history. Thus the bacteria was named Lactobacillus sanfranciscensis  and has amazingly only ever been found in sourdough but not nature despite all sourdough being inoculated by wild microbes.

Anyone just about anywhere in the world can capture wild microbes to start a sourdough culture. Like beer, the yeasts produce ethanol and carbon dioxide. What separates sourdough from normal bread baking is the inclusion of bacteria that produces lactic acid. All that is needed is a yeast that doesn’t care for maltose and a bacteria that thrives on maltose. The latter is what provides the lactic tang to sourdough. Compared to the carefully controlled environment provided by brewers of beer, sourdough is uncontrolled and wild.

My mother is fascinated that my loaves of bread are risen by nothing more than some wild microbes I captured from the barnyard. My recipe only contains flour, water, salt and the wild microbes!

Conclusion

Both processes involve inoculating cereal grains with yeast to produce carbon dioxide and ethanol. Of those byproducts, beer releases the carbon dioxide while retaining the ethanol. The exact opposite is true in bread baking: the alcohol is cooked off while the carbon dioxide is trapped within the elastic gluten yielding the bubbles in the crumb of bread.  Sourdough microbes are relatively uncontrolled when contrasted to carefully selected inoculation of sterile microbe-food in beer wort.

To be fair, spontaneous fermentation is also used in a very small proportion of beer styles referred to as sour beers like belgian lambics. It is certainly an acquired taste and one that I’ve acquired fiercely.

Standard
Kitchen Adventures

New Category: In the kitchen!

Much of my sustainable living goals put me into the kitchen. If I can’t make something from scratch, my next best option is to purchase raw ingredients in bulk so make the specialized products myself. In fact I make 32 oz of contact solution for $1.52 when it sells for $28 but I get a lot of flak from people who are not confident in their knowledge of chemistry and think I am nuts for using something on my eyes that is homemade so I have not posted it.

Back on topic: I have made a new category for making products in the kitchen. This will range from soap and the subsequent products that can be made from soap to baking to cooking to beer to cheesemaking while also including making non-food products in the home.

The first new posts in this category will be sourdough baking and beer brewing. Two closely related but very distinctly different forms of baking and microbiology!

Standard