Kitchen Adventures

Many uses for whey

So you decided to try out making cheese or yogurt for the first time. Now you have a disappointing amount of your desired product, and an alarming amount of whey byproduct. Fear not, whey is so useful, that industrial production of this once waste product has surpassed production of actual cheese!

A word of warning, whey contains a concentrated amount of the substances that cause dairy and lactose allergies/intolerances.

Nutrition

Most of the fats and proteins have been removed from the whey when the solids were extracted for cheese/yogurt. While the remaining nutrition is mostly sugars, the vitamins and minerals are valuable. A cup of weight contains 60 calories, 13 grams of carbohydrates and numerous micronutrients (source).

Ways I’ve used Whey

Yogurt whey is fermented thus packed with the probiotics that many people (including myself) pay good money for. I drink a few ounces of whey when I wake up in the morning on an empty stomach. It has a weird combination of savory with an acidic tartness that I’ve acquired a taste for…likely from my love of sour beers and kombucha. Expect the same effects as probiotics…especially if you are relatively new to the scene! Mozzarella whey is not biologically active however if I am running low on yogurt whey, I will inoculate the former with the latter.

While cheese whey lacks the good microbes of yogurt whey, it is still full of nutrition. Furthermore it’s acidic properties pull great amounts of calcium, collagen and flavor from animal parts when used as the base in a stock (my observation, no scientific basis). Before I discovered whey, I used a vinegar water base to try and achieve the same effect. With the boost in nutrition comes a boost in calories as well that should be accounted for. I usually wake up with yogurt whey and go to bed with whey-based bone broth.

Similarly, when I still ate bread nothing was better than a loaf of sourdough with the the water replaced by whey. I can’t even describe the change in flavor but it was irresistible. If I could comfortably digest the products of baking, I would be trying whey in everything!

Seeing as protein is the most expensive food source for any creature, I have fed whey to livestock as well as pets. Fair warning, introduce whey slowly and incrementally into an animal’s diet to prevent having some loose messes to clean.

As a last resort, whey can be added to the compost pile or to the soil as an acidifying fertilizinger. If you have neither compost nor acid-loving plants, find someone with a compost pile or who grows blueberries or tomatoes!

Ways I want to use whey

Whey reduced the occurrence and rate of progress of powdery mildew in squash and cucumber plants (source). It seems weekly applications of 25% whey are the most effective, but more research is needed for exact timing and quantity determinations. I may try it on my grapes for the intended purpose and to see if there is any effect on the devastating japanese beetle populations.

Next time you make yogurt or cheese, smell your hands a few hours later. They will smell like those expensive cosmetics made with lanolin. In fact the smell is such an exact match, I would not be surprised is news broke that these products were being falsely advertised. Next batch of soap that I make, I will add some whey!

I’ve come across quite a few recipes for whey-based beverages ranging from simple, refreshing lemonade to creative cocktails. Citrus flavors and whey would be symbiotically complimentary in my opinion so I am going to try them out! I will surely report back.

Lastly, I am inexplicably eager to try out fermenting food. Everything from mayo, to krauts and kimchi to salsa to anything that can be brined or pickled is on the radar. Whey is known to kickstart those processes but I’ve read some foods are better suited for whey inoculation than others. Until I can report back with real experience, I have to defer this subject to your own research.

Conclusion

These are the options I’ve encountered or researched but I am sure there are many more. Putting whey down the drain is a water pollutant and a waste of a good resource so I hope you can find a way to put it to use!
Standard
Kitchen Adventures

Easy Mozzarella Cheese Recipe (Expanded version)

Making mozzarella cheese at home is easy but time-consuming. One batch takes about 2 hours and yields 13 oz of cheese per gallon of milk which for me, is 13- 85 calorie servings.

Followup to the bare bones recipe posted yesterday.

Tools Required:

  • Pot to hold 1 gallon of high fat milk
  • Thermometer (affiliate link)
  • Measuring cups and teaspoons
  • stirring instrument like a whisk or fork
  • plate to hold curds between steps
  • Latex or similar gloves to provide a minute heat barrier
  • Ladle for dunking curds in the whey (I use a 1 cup measuring cup)

Materials Required:

  • Time – 2 hours active, 0 hours passive
  • 1 gallon of high fat milk
  • 1/8 teaspoon liquid rennet (can use other types, just follow the directions on the box) Affiliate link
  • ~2 teaspoons of sea salt
  • 1 teaspoon acid to get milk to curdle. Affiliate links: small, economically large (I use it in DIY dishwasher detergent)

Procedure:

  1. Pour milk into crock pot or regular pot and slowly heat milk to 55 degrees Fahrenheit (13 C)
  2. While milk is heating, stir the acid into a bit room temp water- just enough to dissolve the acid.
  3. When the milk is 55 degrees, stir in the acid solution then continue heating.
  4. While milk and acid is heating, dissolve the rennet in the same manner as the acid
  5. When the milk reaches 88 degrees Fahrenheit (31 C) then stir in the rennet.
    1. Do not stir any more after this point!
  6. Slowly heat to 110 degrees (43 C) then hold the temperature until the curds pull to the middle leaving clear whey around the sides.
  7. Scoop out and drain the curds while heating the remaining whey to about 175 degrees (80 C).
  8. Aggregate the curds into a few groups, then dunk and hold in the hot whey kneading between dunks.
    1. The dunking and kneading is to raise the entire curd to the right temperature which is too hot to handle.
    2. Don latex gloves for kneading.
  9. Once the cheese is almost done, add a few teaspoons of salt to the whey.
  10. Repeat dunking until the cheese is smooth and stretches like taffy.
    1. It can now be rolled and cut/twisted or balled or however you wish to store it.
    2. If it starts breaking instead of stretching, just redunk to warm it back up
  11. Eat, refrigerate for up to 2 weeks or freeze the finished cheese.


Pictures:

20160410_151911

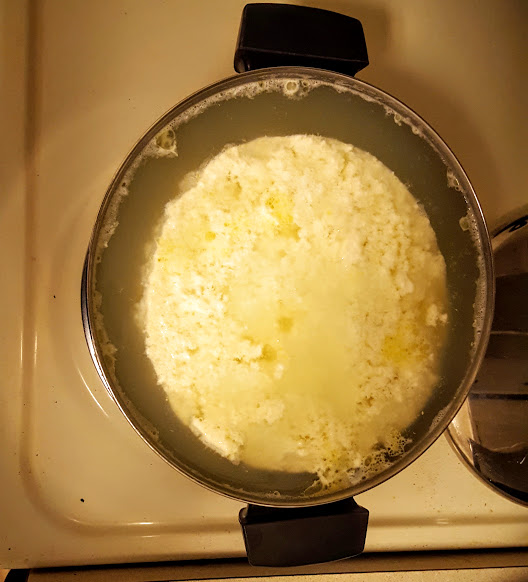
Curds are fully separated from the whey

20160410_152111

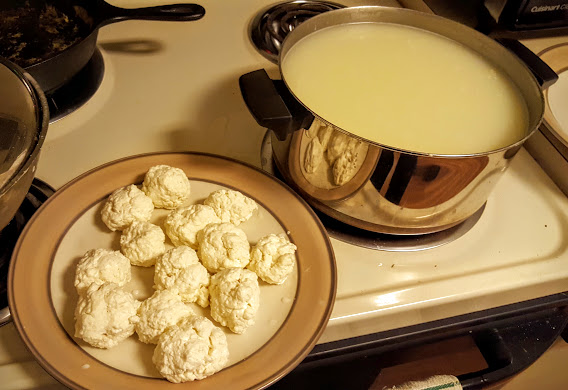
Collecting the curds and straining the whey. Cheese is starting to reveal itself!

20160410_154322

First round of dunking the irregular, lumpy curds into the hot whey

20160410_162603

Ready for the final dunking. As the curds turn to cheese demonstrated by their smoothness, I consolidate them into the storage size. I also keep a little sample set aside for immediate eating.

20160410_162718

Final amount of cheese from 1 gallon of milk. Side note: I adore and fully endorse this scale (affiliate link)

Yes, that’s right…1 gallon of milk only yields 13 oz. of cheese. It takes less time overall but a lot more work than yogurt and the result is a biologically inactive product. Although I love cheese, the roughly 3/4 gallon of whey that remains is my try goal. I mostly use it in to make stock in combination with animal bones, or inoculate it with yogurt whey to replace my $60/month probiotic. Luckily the whey is so useful, the once waste bi-product of cheese making has overtaken industrial production of the valuable cheese itself. I’ll explain more ways to utilize whey tomorrow!

If you possess a greater amount of patience than me, you can keep the curds warm to roll, stretch, twist, cut, etc. your way into beautifully presentable cheese. When I use mozzarella, it is to grate for pizza/pasta type dishes or rip chunks off to stuff under fish or fowl skin before baking. So I don’t put much effort into presentation. It is however rich and delicious but you will likely need to play with the salt levels in the dunking whey to nail your desired levels.

Standard
Kitchen Adventures

Easy Mozzarella Cheese DIY (simplified recipe)

The process to make mozzarella cheese is so simple but a bit time consuming. This recipe assumes 1 gallon of milk with 1 teaspoon of citric acid and 1/8 teaspoon rennet, both diluted in a small amount of water.

  1. Heat milk to 55 degrees Fahrenheit (13 C) then stir in an acid.
  2. Slowly heat to 88 degrees Fahrenheit (31 C) then stir in the rennet.
  3. Slowly heat to 110 degrees (43 C) then hold the temperature leaving the pot unstirred until the curds pull to the middle leaving clear whey around the sides.
  4. Scoop out and drain the curds while heating the remaining whey to about 175 degrees (80 C).
  5. Aggregate the curds into a few groups, then dunk and hold in the hot whey kneading between dunks.
  6. Once the cheese is almost done, add a few teaspoons of salt to the whey.
  7. Repeat dunking until the cheese is smooth and stretches like taffy.
  8. Eat, refrigerate for up to 2 weeks or freeze the finished cheese.

Don’t discard the whey! I’m working on a post to describe all the uses for this nutritious and versatile substance! I will also post a more detailed recipe tomorrow but I know some readers appreciate concise DIY posts. Enjoy!


Standard
Kitchen Adventures

First attempt at making yogurt in the crockpot

I’ll be brief and minimally graphic in this introduction. A waterborne illness infected my body in Africa and wrought havoc on my digestive tract and consequently my immune system for 16 months. My doctor was astounded I hadn’t taken any antibiotics because she found alarmingly low levels of the required microbes in my intestinal tract. She recommended nearly unfathomable amounts of probiotics, incorporating fermented foods into my diet and feeding those microbes with vegetable based fiber. Unpasteurized full fat yogurt, VSL #3 (affiliate link) and farmers market sauerkraut (and recently I have added kombucha) were the factors that brought my recovery at long last. Since all of these are very expensive or simply unavailable except seasonally, I decided to try and make my own family of inexpensive probiotic foods. Surprisingly, my first attempt yielded the most amazingly rich and tart yogurt I have ever had!

20160409_145921

Tools Required:

  1. Slow-cooker, preferably with a warm setting. Mine is a staple of my kitchen and stays warm for 6 hours after cooking (affiliate link)
  2. Pot if you are going to use the double boiler method. Otherwise just use the ceramic crock pot!
  3. Half Gallon of high fat milk
  4. Whisk or fork
  5. Tightly woven fabric for straining if thicker or greek style yogurt is prefered. Cheesecloth is too open, so use muslin or similar fabric (affiliate link)
  6. Stove to heat pot
  7. Thermometer (affiliate link)

Materials Required

  1. Time: 1.5 hours active, 15 hours passive
  2. High Fat Milk
  3. Yogurt culture: either biologically active commercial yogurt (check label for microbes) or probiotics (affiliate link)

Procedure

  1. Pour a half cup or so of milk into a bowl and stir in your starter culture (material #3)
  2. Pour the rest of the milk into the pot and slowly heat it up to 180-200 degrees (82-93 C).
    1. Some literature says this alters the protein structure so the milk sets rather than separating into curds and whey.
    2. Heat slowly and stir often to ensure milk does not scorch or burn on the bottom
  3. When the milk reaches 180-200 degrees, add a few cups (not so much that it overflows your yogurt pot) of cold tap water to the crockpot then transfer to the pot with the hot milk to the crockpot. Add more cold water if there is room.
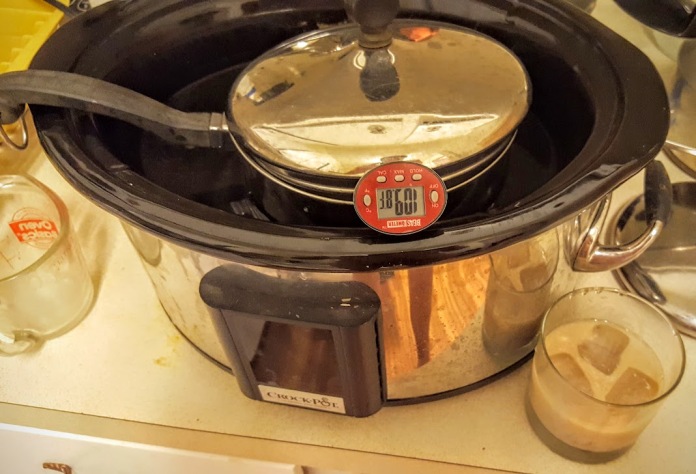
    1. Somehow, without any further action the temperature of the milk/water in the crock pot equalized after 10 minutes perfectly at 110, the desired temperature!
  4. Cool the hot milk to 110 degrees (43 C) then stir in the starter culture from step 1
  5. Keep the temperature at 110 for 2-4 hours
    1. I turn the crockpot on warm for 30 minutes, off until the temperature drops to 100. Then repeat as necessary.
  6. After ensuring the milk is at 110, wrap the entire ceramic part of the crockpot with a towel or blanket for insulation, then transfer to the oven for another 6-10 hours.
    1. The oven simply provides insulation so turn the light on if you have one. Alternatively you can use a cooler or a pile of blankets or towels.
  7. Check the yogurt to see if it has set properly and to the desired extent. If not, just let it keep fermenting and warm it up if you can.
  8. If the yogurt has set, transfer to your desired storage containers and refrigerate.
    1. The rest of the steps are optional!
  9. If you like your yogurt more tart, let it keep fermenting and taste test until it gets there
  10. If you like thicker yogurt or greek yogurt, straining is required. Either:
    1. Line a colander with the straining fabric
    2. Hang the linked yogurt bag above a 2 quart bowl
      1. Using this method yields 17 oz. (weight) of yogurt and about 30 oz (fluid) of whey per half gallon of milk, or 4 234 calorie servings.

Some pictures of the process

20160408_220347

Basic process. Note the most important step: take a bit of the milk for a white russian!

20160409_104018

While coffee is being brewed, the yogurt is strained into greek style after a night of sleep allowed it to ferment and set.


20160409_172136

I like really thick yogurt. Ok ok, my preferred product resembles yogurt cheese more than Greek yogurt!

Whey

20160409_145921

After straining to thicken or make greek yogurt, about half of the volume of milk will remain in the form of whey. Whey is incredibly nutritious: packed with enzymes, probiotics and protein but also contains a concentrated amount of the substances that cause lactose and dairy allergies/intolerances. I’ll write a piece dedicated to whey in the future. For now, you can drink it as a probiotic, inoculate fermenting veggies, substitute it for water in recipes like bread or stock/broth for a protein (and calorie!) boost, spray it on plants to mitigate powdery mildew, add it to soil/compost as an acidifying fertilizer, or feed it to livestock or pets!

Final thoughts

Preface:

As this was my first attempt, I made a small batch in case I failed. This allowed me to use my crockpot and a soup pot as a double boiler. No incubator or specialized equipment was necessary. There is a lot of time required, but it is mostly passive. In the future, I’ll be upping the batch to 1 gallon of milk or more.

Secondly, our bodies are designed to digest fat as a primary food source while carbs cause the inflammation that was originally attributed to cholesterol and fats (and heart disease, high blood pressure). In fact, the human body produces cholesterol to repair the inflammation caused by carbs so high cholesterol is an indicator of a problem, not the problem itself (202 kB PDF Meta-analysis of 76+ studies). More fat in the milk correlates with more yogurt or cheese can be extracted. So don’t fear consuming fat, and use high fat milk for this process!

Lastly, yogurt doesn’t really “go bad” per se. Instead the tartness increases until it reaches vinegar levels. The fermentation acts as a preservative which is why we can leave it unrefrigerated, even more so warmed to the ideal growth temperature for spoilage microbes, for so long with no ill effects. The same can actually be said for milk which turns into yogurt, cheese or any of the fermented products that form staple foods in the Middle East (eg: kefir, laban) and Asia. Although when uncontrolled, potentially harmful microbe colonies can outcompete the desired ones. So as long as a reasonable amount of time has passed while the yogurt was refrigerated and there is no fuzzy discoloration, the yogurt is likely to reach an unpalatable tartness before it actually expires!


Standard
Bees

DIY: $9.33 Insulating Hive Wrap for wintering honeybees

Wrapping the hive for winter is likely not necessary in my region. However everything on a farm boils down to energy management: less energy spent on keeping the cluster warm over winter translates into less energy consumption. This both extends the winter resources as well as lessens honey consumption. The latter point translates into more honey remaining in the spring, thus less need to refill the frames consumed over winter, thus allowing the bees to start storing excess honey sooner, thus increasing the harvest of the following year.

Total price tally (from amazon for universal considerations):

($17 for insulation + $11 for velcro) / 3 hive wraps can be made from these materials = $9.33 per wrap

First of all, I did not take very good pictures of the process so hopefully I can describe the process adequately with words. Secondly, I realize this post is late as I never got it written before I took my break in the fall. Third, as with all of my beekeeping posts [so far] I use 10 frame langstroth hives.

Tools Needed:

  • String or something to measure (tailor’s tape, etc)
  • Scissors
  • Empty hive body (can be any size, we are just after the outer perimeter measurement)
  • Rubbing alcohol and a rag for cleaning

Materials Needed:

  • Reflective Bubble Insulation (Affiliate link) 16″ wide by 25 feet (enough for 3 hives of 2 deep supers each) ($16.25 at time of writing)
  • Industrial Velcro, (Affiliate link) 2″ wide by 4 feet (enough for 2.75 hive wraps but see notes below) (I bought mine at walmart for $8 if I remember correctly but use that link as a reference to the exact product but save some money getting it locally) ($11)

IMG_20151102_133006

Procedure:

  1. Use the string to measure the outside of your hive body
    1. My hive bodies are 19-7/8″x16-5/8″ for a total parameter of 73.5″
    2. My actual measurement was just over 74″
    3. I like to compare the measurement to the expected perimeter calculation based off of factory measurements for extra assurance but this is likely not necessary
  2. Add 2 inches to the parameter total to accommodate the overlap needed for velcro
  3. Cut the insulating material to length
  4. Clean the last two inches along opposing edges with alcohol and a rag to ensure adhesive sticks well
  5. Apply velcro to OPPOSING FACES ON OPPOSING ENDS so the velco will align when wrapped around the hive
    1. for clarity: imagine the insulating wrap is a piece of paper. Put on strip of velcro on the top of the front of the page. Put the opposing strip on the bottom of the back of the page.
    2. ALSO BE SURE TO use the two different types of velcro at either of the two ends the loop velcro can catch the fuzzy velcro
  6. Apply to hives!

Picture of the finished product:

IMG_20151112_103626

Oops! On my original design I forgot to account for the overlap needed for the velcro to grab its opposing self so the insulation is cut to the exact perimeter of my supers. Which brings me to my next point.

Notes

This velcro is incredibly strong. After 2 months of use, the maximum of 1/4″ overlap I could barely stretch out of it has held the hive wraps in place without a single issue. I’m actually worried about being able to get the wrap off in the spring had I provided a full 2″ of overlap. After all, its advertised to hold fire extinguishers to the wall! I was also originally planning to reinforce the adhesion to the wrap by stitching the velcro in place. I decided not to for 2 reasons:

  1. The insulation is like unpoppable bubble wrap used as a packing material so stitching through it would have ruined the insulating air pocket under the strips of velcro
  2. After playing with the velcro, I decided it was unnecessary. Ok Ok…I actually dropped the velcro and almost destroyed the carpet trying to detach them from each other. If the adhesion wears out down the road, you all will be the first to know!

Insulation power:

The insulating wrap I linked to has a extremely low insulation value: R=1.04 which is roughly equivalent to 1 inch of solid wood, increased to 4 if a 3/4″ gap is made. That gap could be achieved by putting blocks of wood under each of the 8 corners but the work required was not worth it for me. Regardless, this current set up serves me fine as I doubt I even need insulation. If your location calls for more insulation, I would use many many many layers of this or use the age old method of hay bales (or both in combination) or leave snow piled up around the hive with the entrances clear for ventilation.

Dimensions:

I chose 16 inch insulation because overwintering, my hives are 2 deep supers: each 9-5/8″ tall or about 19″ total. The 3 inches of difference leaves the bottom entrances open for ventilation as well as the top entrance (although I keep that one plugged unless condensation becomes an issue). If you have a different hive configuration you will need to calculate or measure the required width and buy or cut the insulation to that figure.

Similarly, I use 10 frame deep supers so if your configuration is different you will need to calculate or measure the length requirement of the insulation. Don’t worry it is simple and discussed in steps 1-2 above.

Final thoughts

The setting sun can hit these hives and reflect off in blinding fashion that makes it look like the hives are on fire. If your apiary has a line of sight to a roadway or bee thieves are a valid concern, you may want cover the outside with an additional layer of fabric or paint. Also this makes me wonder if the wrap is causing the hives to lose that warmth but I feel that keeping in heat is more valuable than capturing it in the winter (although backed by no calculations).

Also after seeing how ferociously strong the velcro is, next time I am going to use only a few inches at each corner and maybe on in the middle instead of lining the entire length of the end of the insulation.

Lastly, I may build a collar of sorts for the hives out of scrap wood to give the insulation the 3/4″ gap that quadruples its insulating rating. It would be a simple wood frame that sits down over the hive to be wrapped instead of the hive itself.

Honestly with the low insulation this provides, the benefit is likely more psychological to the beekeeper than anything else. As bees are best left undisturbed over winter, it is a hard time for a keeper who is uncomfortable with taking a hands-off approach. This at least provides a piece of mind that the keeper is doing everything in her or his power to help the bees survive!

Standard
Bees

Simple DIY Honeybee Waterer from 2 common items: Cork and bucket

This summer dryness is really affecting the flora and fauna of the farm. My part of the Shenandoah Valley has not had a strong rain since early July. My bees need water like the rest of the plants and animals! Bees need a water source where they won’t drown while drinking. If you are a beekeeper, be a good neighbor and provide your bees with a source of drinking water. Nothing will provoke the wrath of those uneducated about bee behavior quicker than their swimming pools or fountains or birdbaths being constantly full of your bees. I mention uneducated because bees are not aggressive when foraging for resources thus pose little threat unless crushed with bare skin and most people cover their irrational phobias of bees by stating they are allergic when only 1 or 2 people out of 1,000 are actually allergic (Source: USDA). However, those hypothetical neighbors are completely in their rights in wanting to keep bees from congregating in highly trafficked areas.

All that is needed for this project is wine corks and a 5 gallon bucket. Corks are easy to procure even if you don’t drink wine. Restaurants, wine stores, wine tasting events and friends are all potential places that may accumulate wine corks. Mine came from a tent at a wine festival.

Tools required:

None…maybe a wine opener deserves to be included?

Materials:

  • Bucket (You decide the size that is right for you)
  • Wine corks

Procedure:

  • Put wine corks in bucket
  • Fill bucket with water

Alternative Procedure

  • Fill bucket with water
  • Put wine corks in bucket

I jest but this project is incredibly simple. The corks give the bees a place to land and rest while drinking while the bucket holds enough water for quite some time.

Mosquitos suck. I’m anal about standing water on the farm. A zero tolerance policy is in effect. There is literally not a single drop of exposed water on the farm so last week I went on a 3 hour hunt to find the source of the mosquitoes who were biting me one evening. I finally found two tires I was storing behind the barn (to make cement filled mobile fence posts) that had filled with water. When I set out to write this post, I realized I never heard any justification for the oft advised figure of 1 week as the time to replace water to prevent mosquitos. So I researched myself.

After reading various agricultural and etymological sources, I found that mosquitoes can go from egg to adult in 4-14 days depending on the species and conditions. Thus I will strive to change this water every three or four days!

Armed with only anecdotal evidence as most scientific efforts are focused on more important aspects of honeybees, I can tell you that in my observations and many many others on forums and in beekeeping meetings that honeybees tend to flock to stinky water whether it is stagnant or contains some other odor like chlorine. Thus I recommend adding something smelly like essential oils. Without an emulsifier, the oils will not mix into the water and only serve as an attractant. I would not use this technique to deliver anything meant for varroa treatment like wintergreen, spearmint, thyme, lemongrass, etc.

I do however add a small quantity of salt to the water. Up until recently, the published science has only stated that salt lessens the lifespan of bees. However, any beekeeper that has worked in the summer has noticed the bees landing on their skin only to drink the salty sweat. Pools are notorious for luring bees. Now the science is finding that bees have salt taste receptors on their feet and have found this is the reason they are attracted to chlorine salts in pools as well as the newer saltwater pools. Furthermore, they don’t have to even land near the water; those taste receptors can sense it in the air (source: livescience.com). Even more, beekeeping publications like Ross Conrad’s article on Bee Tea in Bee Culture (August 2010) are claiming boosted immune systems of bees from mineral salt. The science has yet to catch up to substantiate these claims.

Beekeeping, like most other fields of agriculture, is incredibly slow to adapt and change. Beekeeping has seen little technological advancement since the advent of the Langstroth hive in 1850. So my decision is to try to stay ahead of the curve in this instance and add 2 teaspoons of salt per gallon to my feeding water.


Standard
Bees

Self Filtering Solar Wax Melter for Beeswax from 4 commonly available second hand items

I love discovering methods to process farm products without using any energy; even more so when one of the requirements to process said products is heat. I have to gush over the success of this quick and easy project as I designed it around the concept of a car heating up when parked in the summer sun. Beeswax melts around 150 °F/65°C so summer sun is all you need!

Beeswax sticks to absolutely everything and is nearly impossible to get off once it sets. In the past, running molten beeswax through a strainer resulted in immediately congealing wax that clogged and overflowed on the kitchen counter. Amazingly, with this design the only items that touch molten beeswax is the strainer, filter and pot. As the wax is held at molten temperatures for the duration of the process, the only item that retains any wax is the tiny bit the optional cheesecloth filter absorbs and a very thin film on the inside of the pot.

So I’ve pieced this design together over the last few months. For the long and entertaining story of my trials and tribulations, see this post.

Note: I always freeze the wax overnight first to ensure no wax moth eggs or other bugs survive. Then I just store it in airtight containers until I build up a large stock to melt in the summer. Below I will quote and link to new products, but I acquired everything except the cheesecloth secondhand for a final investment of $28.80 or $83 when buying everything new from amazon. Below is my exact setup just to make sure everything fit together!

Items Needed:

Cooler (lid not needed) tall enough to fit the pot. Alternatively a temperature safe box (maybe a bucket would work?) that you insulate with blankets, etc. ($28 new)

Stockpot or something similar with no plastic pieces ($25 new)

Scrap piece of glass or Plexiglas that lays flat atop the cooler (The cheapest option on amazon that most closely matches my 1/8″ thick 14″ x 24″ custom piece is the plexiglas from this frame, $17 new)

Metal strainer that fits atop the pot ($8 new)

(Optional): Cheesecloth or Nut milk bag and string to attach it to strainer. Only needed if pure wax is required for candle making, etc. ($6 new for a convenient bag that fits the 8″ strainer)

Extras:

Bungee cord, rope, etc. to secure the glass to the top of the cooler (improvise for free! But if you need a bungee cord: $5 new for adjustable single or $9 for a set if you don’t know the size you need and need to link multiples)

Oven mits for handling the utensils in the melter after the wax has rendered (no link needed)


Build and Operating Procedure:

  1. Attach cheesecloth beneath strainer if extra filtration is required. Otherwise, omit the cheesecloth.
  2. Place strainer atop the pot
  3. Place your wax into the strainer
  4. Place the pot with wax-filled strainer into the cooler
  5. Place the glass/Plexiglas panel atop the cooler
  6. Set the entire melter in the sun and simply wait until the wax has melted
  7. Remove the pot filled with liquid wax USING OVEN MITS! EVERYTHING INSIDE THE MELTER WILL BE HOT
  8. Quickly but safely pour the wax into your molds of choice before it has a chance to cool. I just use paper cups!
  9. Peel the paper cups away after the wax cools and simply store the wax in a manner that prevents critter intrusion or weigh it for sale.


IMG_20150903_110854

IMG_20150902_115930

Note on pictures: I really wanted to include pictures of the whole process. However every single day this week at 12:30 pm, thunderclouds rolled in. Even worse, they never yielded much needed rain! Pictures will be updated on the next sunny day, Monday or tuesday appear promising.

Acquiring the materials

The cooler: Craigslist is probably the best option but keep an eye open at yard sales or thrift stores as well. The cooler pictured is one that was not longer in use by my parents, but I also acquired from craigslist years ago for $10 an old 5 gallon igloo drink cooler like the ones you see at sporting events. It was my first mash tun before I upgraded my homebrewing beer setup to 10 gallon batches. You may be able to do even better by rescuing a cooler with a lost lid, as all the lid does on my cooler is catch wind and flop the whole set up over. Alternatively you could just make a simple wooden box or possibly insulate a standard five gallon bucket. In fact, I may try the next batch in a bucket just to see if it works. Whatever you choose, make sure the pot fits!

Pot: I chose a stockpot for this project. The dimensions are efficient to fit within a wide array of coolers, compact handholds instead of long handle(s) is better accommodated within the cooler, and there is no plastic. I acquired mine for $4 at the thrift store. The previous owner had damaged the enamel coating inside the pot which matters not for this project. In fact if a friend or family member has done the same, you may be able to get a free one!

Strainer: $1 at a thrift store. I’m considering buying a new one without a plastic handle as they are ~$5 on amazon or simply cutting off either the plastic or the entire handle. The handle could also be cut off to fit in a smaller cooler. Plastic + heat + UV rays = either melting or off gassing of chemicals or deterioration.

Glass/Plexiglass: I was originally scouring the barn loft for a discarded storm window. Then I considered checking out the Habitat for Humanity Re-store where contractors cheaply offload unneeded or recycled building materials…basically a thrift store for building materials. I even called an autoglass shop looking for scraps. By chance when I went to the local hardware store for an unrelated purpose, I inquired about getting glass and Plexiglas cut. The quotes were around $5 and $11, respectively. Way cheaper than I was expecting so I chose Plexiglas for durability. It also occurred to me that my dimensions closely match those of cheap poster wall-hanging frames like I had in college. One could be cannibalized from the thrift store!

Cheesecloth: Amazon or Walmart or I’ve even seen them in grocery stores however they were add on items hanging in random isles. The plus side is that I found mine hanging in the canned food isle on sale for $2 for a 6 yard cloth. After the first test run with cheesecloth, I might be looking for something more substantial like the bags on amazon for about $5 that are made from better cotton intended for yogurt or nut milk.

Standard